PB&J Smoothie

Raise your hand if you love amaaaazing smoothies!!!!

Well, you’re in luck!

This one is a great way to enjoy all of the great flavors of a PB&J sandwich without any of the nasty ingredients! I know….right?!?!

Sound a little too weird for ya? I dare you to give it a try! And I bet you $0.06 you’ll fall in love!!!! Please let me know…I’m on the edge of my seat over here….

(Psst….If you enjoy this recipe, be sure to get yourself a copy of our additive-free cookbook & grocery shopping guide, “Eating Additive-Free“! It’s stuffed with 150+ more tasty recipes plus a boatload of additive-free shopping tips!! Your satisfaction is guaranteed…or your money back!)

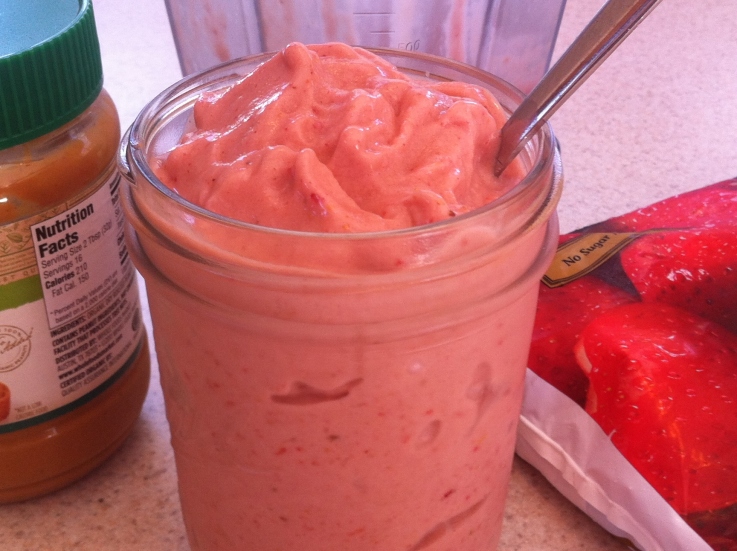
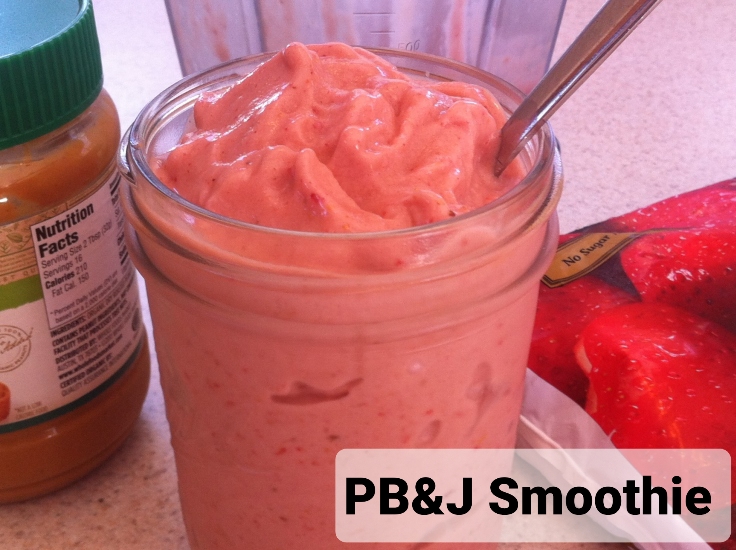
PB&J Smoothie Recipe

Serves 1 (makes about 2 cups)

INGREDIENTS:

1/2 cup water
1 TBSP honey*
1 TBSP peanut butter* or 2 TBSP peanuts* (We use unsalted varieties, but salted varieties taste good, too! Also, you can use almonds or almond butter instead, if you prefer, but that won’t technically be “PB&J.”)
1 1/2 frozen bananas
1 cup frozen strawberries

*Check out our Grocery Shopping Guide for our tips on selecting the most additive-free versions of these ingredients.

DIRECTIONS:

I’ve only made this recipe in a high-powered blender (e.g., VitaMix or Blendtec).
If using a standard blender, you should use nut butter rather than the whole nuts, and you may need to add more water. And you’ll most likely end up with a more drinkable (runny) smoothie compared to the scoop-able type shown here.

Place all ingredients into a high-powered blender in the order listed above. If you’re using nuts instead of nut butter, it’s best to blend those with the water, first, before adding the other ingredients. That way you won’t have nut chunks in your smoothie.

Blend on high speed until desired consistency is reached. Don’t feel ANY shame if you lick your glass clean.

Just sayin’.

OH….AND BE SURE TO CHECK OUT OUR RECIPES PAGE FOR MORE GREAT RECIPES, TOO!!!

PBJSmoothie

Roasted Brussels Sprouts

roasted brussels sprouts

CHECK OUT OUR RECIPES PAGE FOR MORE GREAT RECIPES!!!

The first time I prepared my own Brussels sprouts, I purchased them on the stalk at a local farmers market. It was pretty fun walking around with that big ol’ thing…feeling all authentic-like! LOL!

Then, before I cooked them I plucked them each from the stalk…washed them, removed the outer leaves. Followed instructions online for trimming the stems and painstakingly cutting each sprout in half and trimming each stem! OMG! What. A. PAIN!

Then….I melted some butter in a skillet and sauteed them up. But….only so many would fit in the pan…so I had to make several separate batches!!! Ahhhhh!!!! 

Don’t get me wrong, they were super yummy….buuuuuuuuuuuuuut…it was a super long time before I ever prepared them again. Because…well….pain in the A$$!

Years later, I decided to try an experiment…forget all the hard work. Just enjoy the dish!

So, here’s how I do it now. No muss, no fuss…enjoy!!!

(Psst….If you enjoy this recipe,  be sure to get yourself a copy of our additive-free cookbook & grocery shopping guide, “Eating Additive-Free“! It’s stuffed with 150+ more tasty recipes!! Your satisfaction is guaranteed…or your money back!)

Oven Roasted Brussels Sprouts Recipe

Serves 4

(Well, the package says it serves ELEVEN! Lol! And Chad and I ate nearly the whole batch in one sitting…so….let’s just say it’s 4 servings, shall we?!?! Ha!)

INGREDIENTS:

2 lbs of prepared/washed Brussels sprouts (pre-packaged in the produce section)

1/3 cup melted coconut oil (or oil of your choice)

Sea salt, to taste

DIRECTIONS:

Preheat oven to 350 degrees.

Toss Brussels sprouts and oil together in a casserole pan.

Cover with foil, and bake for about 40 minutes until desired tenderness is reached, stirring occasionally.

Uncover, and bake about 10 more minutes until browned to your preference.

Sprinkle with sea salt, and enjoy!

(WARNING: Careful, these babies will burn the crap outta your mouth if you’re not careful. You will be greatly rewarded if  you have enough patience to allow for a few minutes of cooling time. Or just dish up your serving…and then cut each of your sprouts in half before you bite into any of them. These taste way better if your taste buds aren’t burned off! Just sayin.’)

CHECK OUT OUR RECIPES PAGE FOR MORE GREAT RECIPES!!!

Instant Pot Chicken Stock

20191108_090314

Let’s be real…store-bought stock tastes like crap! (And most of it is full of crappy ingredients, too! Ewww!)

I’ve made my own stock at home for many years. And, although it takes all day to be ready, I’ve always felt it was worth it. (Because…seriously, that store-bought stuff is naaaa…aaaa..aaaa…sty!)

Homemade stock is so incredibly tasty that I usually slurp down an entire cup (or 2) of it as soon as it’s ready. (In fact, I’m drinking some right now while the rest of the batch cools down for the soup I’m making with it tomorrow. Mmmmm….mmmmmm….mmmmm!)

I used to make my stock in a crock pot, but then I got myself an awesome new gadget that has revolutionized my stock-making experience!

Behold, the Instant Pot – a super convenient pressure cooker that cooks up my yummy homemade stock in just 2 hours start-to-finish! Score!!!

Instant Pot Chicken Stock

Makes about 12 cups

INGREDIENTS:

1 chicken carcass (the bones leftover from a roasted chicken; no skin)*

1 medium onion, chopped into large pieces (you can leave the skin on)

2 carrots, broken into large chunks

Celery, broken into large chunks (OPTIONAL) – I used to use a couple stalks, or just the tops/scraps from 1 bunch of celery…but now I prefer to skip the celery.

1 head garlic (no need to peel…just cut the head in half to expose the cloves, and toss it in)

2 TBSP dried Thyme

2 TBSP apple cider vinegar

1/2 TBSP whole peppercorns

1 heaping TBSP sea salt

Water

*If your chicken included a neck and/or innards (organs) that you aren’t going to cook, freeze those and toss them into the pot along with the carcass when you make this stock.

DIRECTIONS:

Toss all ingredients into a 6-quart Instant Pot.

Add water to fill pot to the 2/3 full line (or “PC Max” line).

Lock the lid and move the steam release valve to the “Sealing” position.

Pressure Cook on High for 1 hour.

You can go longer for richer flavor, but I’ve found that 60 minutes is plenty. I’ve even pushed it to just 45 minutes with success when I’m in a rush.

*Also note, it may take about 30 minutes for the Instant Pot to reach pressure for this recipe because there’s so much liquid involved. So keep that in mind when figuring how long the entire process will take – – about 2 full hours or so of TOTAL Instant Pot time. 

Allow pressure to release naturally for at least 30 minutes.

Then, carefully move the steam release valve to “venting.” Be prepared just in case any liquid comes splattering out! It’s never happened to me, but a towel in hand is always good…just in case.

Wait for the floating valve in the lid to drop, and then remove the lid.

Using a very fine meshed strainer, strain the stock into a very large bowl or pot (see pics below).

Drink or use immediately or store in fridge or freezer for later use.

20190926_18343820190926_183731

20191108_090908

20191108_091207


20190926_211758

Chocolate Nut & Seed Clusters

20190925_074035.jpg

I found this AMAZING crunchity… chocolately…snackable treat at Costco a few months ago when they happened to be on sale.

I bought them several times, and enjoyed them. Buuuuuuut….then the sale price disappeared…and I couldn’t quite stomach the regular (non-sale) price.

So… I got to work in the kitchen, determined to create an equally delightful homemade version.

Here’s the store-bought version if you’d like to give those a try instead…They are super yummy!!! My recipe is below…

Chocolate Nut & Seed Clusters

Makes: about 1 small (9″ x 13″) cookie sheet full

INGREDIENTS:

1/2 cup raw, unsalted pumpkin seeds
1/2 cup raw, unsalted sunflower seeds
1/2 cup raw, unsalted sliced almonds (or whole almonds, chopped)
1/2 cup (unsweetened) finely shredded coconut
1 cup semi-sweet chocolate chips (we use Guittard brand)
1/4 tsp sea salt

(Psst….If you enjoy this recipe,  be sure to get yourself a copy of our additive-free cookbook & grocery shopping guide, “Eating Additive-Free“! It’s stuffed with 150+ more tasty recipes plus a boatload of additive-free shopping tips!! Your satisfaction is guaranteed…or your money back!)

DIRECTIONS:

  1. Chop the almonds if you didn’t purchase them already sliced. I just pour them into a storage bag and then tap them to bits with a meat mallet. LOL!
  2. In a large skillet over medium-high heat, “toast” the pumpkin seeds for about 1-2 minutes with no oil. Stir or shake the pan quite often, until the seeds are slightly browned (as shown below). Careful, they can burn quickly if you don’t pay attention. Transfer seeds to a medium mixing bowl.
  3. Repeat step 2 with the sunflower seeds. Then add them to the mixing bowl.
  4. Repeat step 2 with the chopped almonds. Then add them to the mixing bowl.
  5. Add the shredded coconut to the mixing bowl, and stir to combine all of the ingredients.
  6. Melt the chocolate chips.
  7. Stir the salt into the melted chocolate.
  8. Add the chocolate to the nut/seed mixture, and stir to combine.
  9. Transfer the mixture to a parchment-line small (9″ x 13″) cookie sheet. Spread the mixture into an even layer so it covers most of the cookie sheet. It does not need to be “packed tightly together,” just make sure there are no large gaps so the mixture will harden together.
  10. Transfer to the fridge for 1-2 hours until hardened.
  11. Break into chunks (“clusters”), and store in an air-tight container on the counter or in the fridge.

20190924_16263020190924_16322520190924_16345820190924_16352720190924_16570020190924_164712

20190925_073304.jpg